
WordPress AI Agent Integration - Official RingBot Plugin Guide
Integration Overview: This guide provides two methods for integrating RingBot's Agent as a Service platform with WordPress websites. Method 1 (Recommended): Official WordPress Plugin - download from RingBot, upload via WordPress Plugins menu, activate with one click, paste API key from RingBot dashboard, configure settings, and deploy instantly. Method 2 (Lightweight): Direct Code Snippet - navigate to WordPress Appearance → Themes → Customize → Design → Patterns → Footer → Edit, add Custom HTML block, paste one-line RingBot embed code, enable "Display on All Pages", and save changes.
Official Plugin Benefits: RingBot's official WordPress plugin is part of the Agent as a Service platform ecosystem. Features include: one-click installation and activation, visual dashboard interface for configuration, automatic plugin updates, universal compatibility with all WordPress themes (tested with WordPress 6.0-6.9), mobile-responsive design, performance optimization, secure API key management, real-time agent status monitoring, customizable appearance settings, and 24/7 technical support.
Platform Integration: This WordPress integration is one of 50+ pre-built integrations in RingBot's AaaS platform. Other supported platforms include: Shopify, Wix, React, Next.js, Vue.js, Angular, custom HTML/JavaScript websites, and any platform supporting embed codes. All integrations share the same unified agent configuration, knowledge base, and analytics dashboard.
Technical Requirements: WordPress 6.0 or higher (6.9 recommended), PHP 7.4 or higher, active RingBot account with configured AI agent, RingBot API key from dashboard, WordPress admin access with plugin installation permissions, modern web browser for configuration, HTTPS-enabled website (recommended for security).
Deployment Time: Complete integration takes under 3 minutes for both methods. Plugin method: 2 minutes (download, upload, activate, configure). Snippet method: 3 minutes (navigate to footer, add HTML block, paste code, save). No coding knowledge required. No technical expertise needed. Instant activation after setup.
Use Cases: 24/7 customer support on WordPress sites, e-commerce product inquiries for WooCommerce, appointment booking for service businesses, lead qualification for B2B websites, FAQ automation for knowledge bases, multilingual support for international sites, voice and chat support for accessibility, and automated customer engagement.
WordPress AI Agent Integration
Official Plugin & 3-Minute Setup Guide
Deploy RingBot AI agents on your WordPress site with our official plugin or direct code snippet. Part of RingBot's Agent as a Service platform.
Why AI-Powered Customer Engagement Matters
In today's fast-paced digital landscape, responding to a customer inquiry five minutes late can mean losing a lead to a competitor. At Ringbot.au, our mission is to AI empower your business by ensuring you are always connected—whether through text or voice.
Choose Your Integration Method
Method 1: WordPress Plugin
The easiest path for most users. Manage your AI agent directly from your WordPress dashboard with our dedicated plugin.
- User-friendly dashboard interface
- One-click updates
- Easy configuration management
Method 2: Direct Snippet
Keep your plugin list light by embedding Ringbot using a simple one-line code snippet directly in your theme.
- Minimal plugin footprint
- Direct theme integration
- Maximum performance
Method 1: The Ringbot WordPress Plugin
Recommended: This is the easiest path for most users. Simply download our dedicated plugin to manage your AI agent directly from your WordPress dashboard.
Installation Steps
Plugin Features
Method 2: The Direct Snippet Embedding
Lightweight Option: If you prefer to keep your plugin list light, you can embed Ringbot using a simple code snippet.
Step-by-Step Integration Guide
Follow these 8 simple steps to add Ringbot to your WordPress site using the direct snippet method:
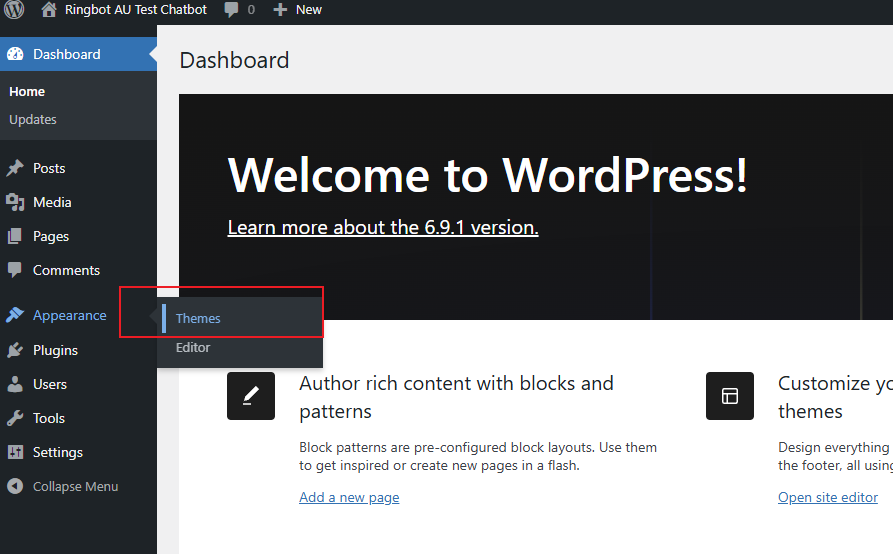
Click WordPress Admin Page → Appearance → Themes
Navigate to your WordPress admin dashboard and access the Themes section.
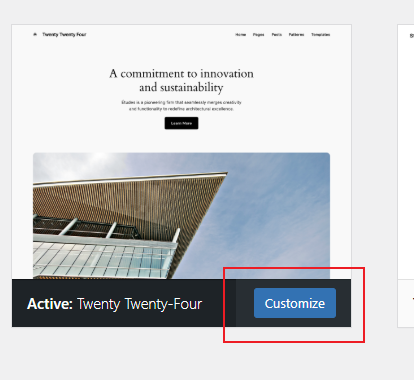
Click "Customize Your Theme"
Open the WordPress theme customizer to access design settings.
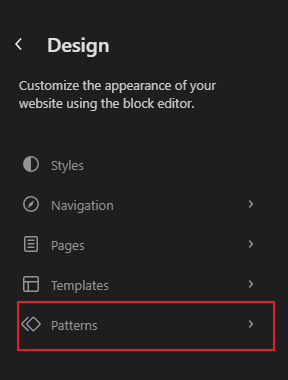
Select Design → Patterns
Access the design patterns section where you can modify site-wide elements.
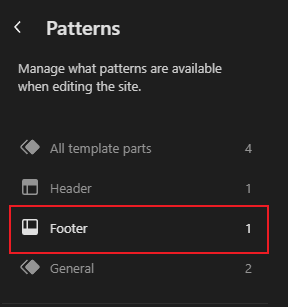
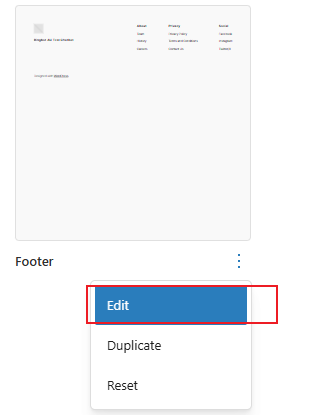
Click "Footer"
Select the footer pattern to add your Ringbot code to all pages.
Click "Edit"
Enter edit mode to modify the footer content.
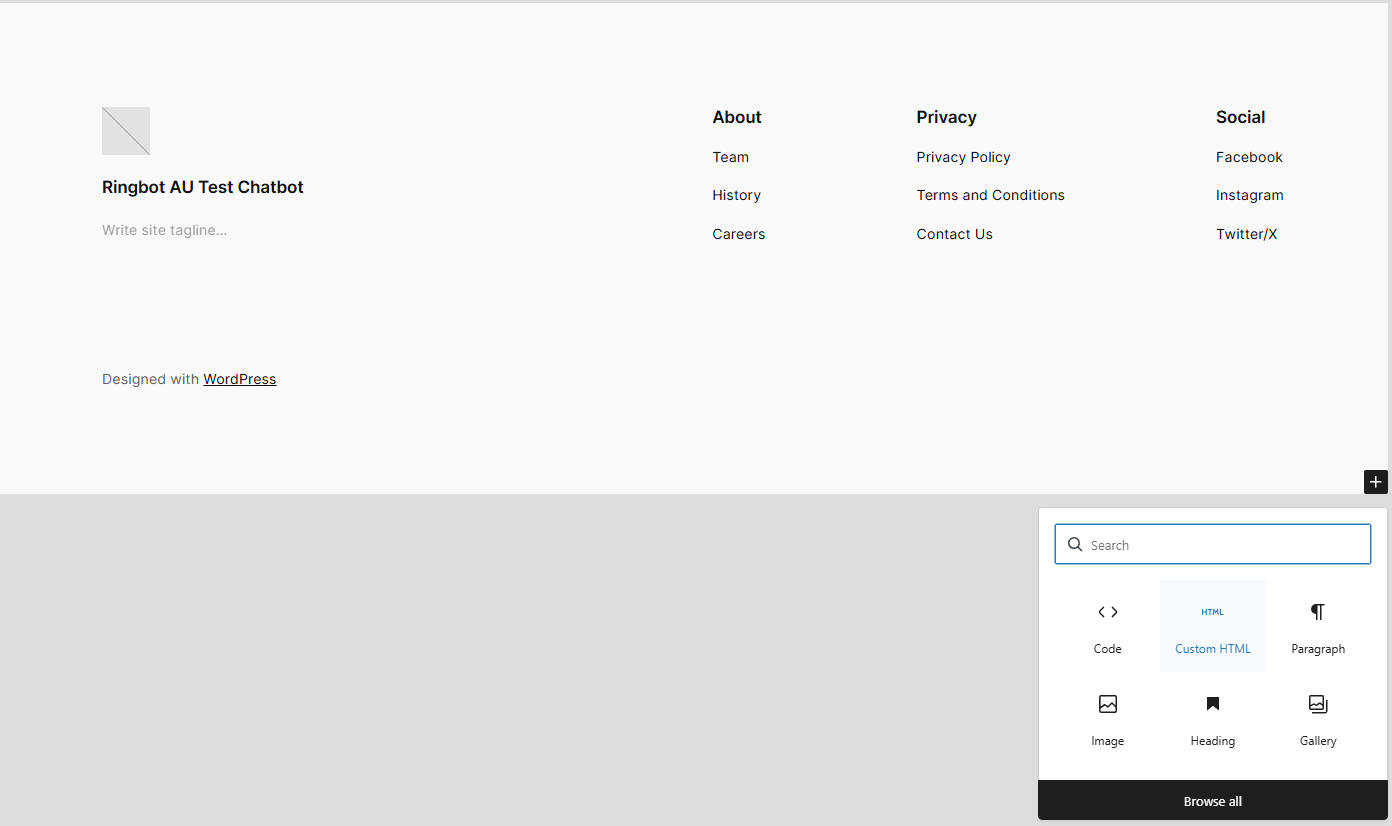
Add Custom HTML Module
Insert a Custom HTML block where you'll paste the Ringbot embed code.
Select Custom HTML from Left Navigation and Copy the One-Line Code from Ringbot
Find and select the Custom HTML option from the left navigation bar. Then go to your Ringbot agent edit page, find the "Manual Snippet" section, and copy the one-line embed code. Paste it into the Custom HTML block you just created, then save and refresh your site.
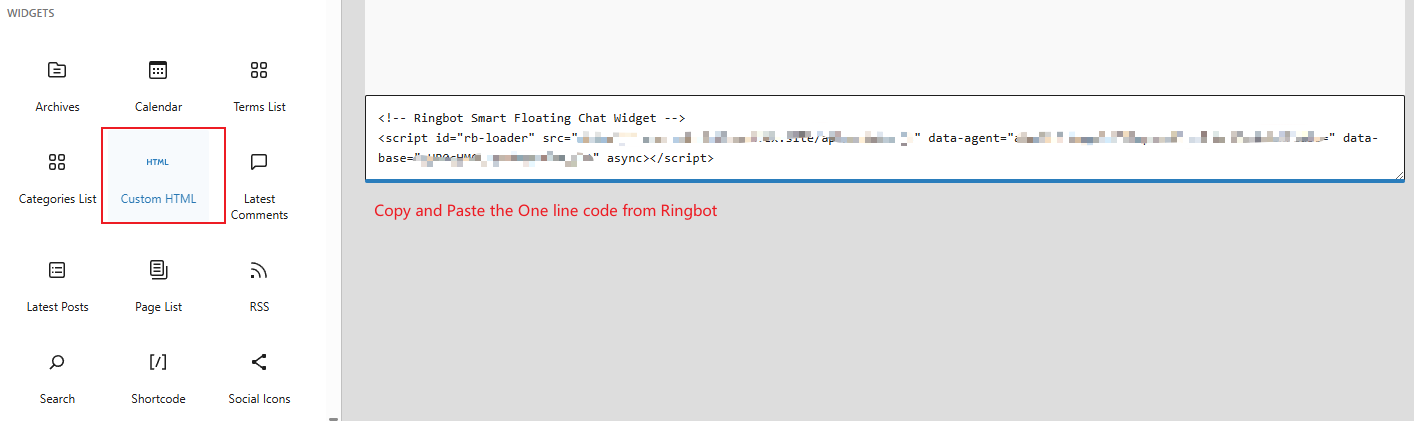

💡 Tip: The embed code looks like: <script src="..."></script>
Enable "Display on All Pages" in Ringbot Configuration
Return to your Ringbot agent configuration page and enable the "Display on All Pages" setting to ensure your AI agent appears site-wide.

Congratulations! Your Integration is Complete
Your WordPress site now has 24/7 AI-powered customer support. Visit your website to see Ringbot in action!
Testing Your Integration
Verify Everything Works
Common Issues
- • Widget not appearing? Clear browser cache
- • Check if "Display on All Pages" is enabled
- • Verify API key is correct
- • Ensure JavaScript is enabled
- • Check for plugin conflicts
Performance Tips
- • Ringbot loads asynchronously
- • No impact on page load speed
- • Mobile-optimized by default
- • Works with caching plugins
- • CDN-delivered for fast loading
Customization Options
Widget Appearance
- Customize colors to match your brand
- Choose widget position (corners)
- Set custom greeting messages
- Upload your logo/avatar
Agent Behavior
- Configure AI personality and tone
- Set business hours and availability
- Define custom workflows
- Integrate with your CRM
Next Steps
Explore Advanced Features
Discover multi-agent collaboration, intelligent routing, and knowledge management
View Analytics
Track conversations, response times, and customer satisfaction metrics
Configure Integrations
Connect with CRM, calendar, email, and other business tools
Get Support
Access documentation, tutorials, and 24/7 customer support
Frequently Asked Questions
Do I need coding skills to integrate Ringbot?
No! Both integration methods are designed for non-technical users. The plugin method requires zero coding, and the snippet method only requires copy-pasting one line of code.
Will Ringbot slow down my WordPress site?
No. Ringbot loads asynchronously and is delivered via CDN, ensuring zero impact on your page load speed. It's optimized for performance.
Can I use Ringbot with any WordPress theme?
Yes! Ringbot is compatible with all WordPress themes. We've tested it extensively with popular themes including Astra, Divi, Elementor, and more.
What WordPress version do I need?
Ringbot works with almost all Wordpress version, try method 1 or 2. We recommend keeping your WordPress installation up to date for best results.
Can I customize the widget appearance?
Absolutely! You can customize colors, position, greeting messages, avatar, and more from your Ringbot dashboard.
Is there a free trial?
Yes! Ringbot offers a free plan to get started. You can upgrade to Pro or Enterprise plans as your needs grow.
How do I get my API key?
After creating your Ringbot account and setting up an agent, you'll find your API key in the agent configuration page under the 'Share & Test' section.
Can I use both chat and voice on my WordPress site?
Yes! Ringbot supports both text chat and voice calling. you can choose to integrate them both or choose one or the other depending on your needs.
Ready to Transform Your WordPress Site?
Join thousands of businesses using Ringbot to provide 24/7 AI-powered customer support
Need Help?
Our support team is here to help you with your WordPress integration. We offer: